Showing posts with label design. Show all posts

Tuesday, December 04, 2007

Floor Plan Possibilities

In my opinion, the most interesting floor plan for a proposed story and a half log cabin is an "L" shaped plan. The majority of the space is the "great room" and is the short leg of the "L". I've included sketches for one way the "L" shape plan may be arranged.

In this design, the first floor plan has two bedrooms, each approximately 11 feet by 15 feet which includes a closet. The bath is adjacent to the bedrooms and is near the kitchen and the "great room".

The kitchen is long and narrow with a long counter with base and wall cabinets. Eating space is on one end. There is room for a dishwasher and small combination washer/dryer, if desired.

The "great room" could be used for a larger dining area, if required, in addition to the living room. The "great room" is approximately 23 feet by 22 feet, large enough for any arrangement of furniture.

The second floor plan is composed of one large bedroom approximately 15 feet by 16 feet including closets. The bath is adjacent to the bedroom. The second floor room is under a sloping roof. The floor area may seem a bit large, but the useable area is restricted by the sloping ceiling.

A stairway fits into a corner opposite of the bath. The stair runs between the first and second floors.

The "gem" of this floor plan is the "great room" with its massive fireplace and hearth in addition to it's vaulted ceiling space and the three sided bank of windows. It is nice if the "great room" faces the view of a lake, river or mountain scene.

A patio could be placed outside the "great room" to enhance the indoor-outdoor relationship. A crawl space is below the first floor to house the necessary mechanical and electrical services, such as a furnace, hot water heater, and pressure tank for the well water.

This log cabin design has 2064 square feet of floor area. Of course, other plan configurations are possible.

Tuesday, October 23, 2007

Wood Truss

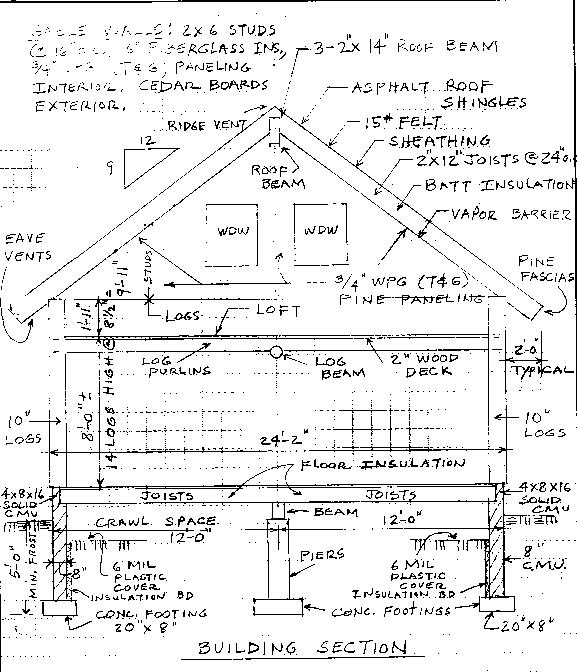
Of all the wood trusses that are constructed for use in a cabin, as an engineer my favorite is the wood truss that is shown in the sketch.

As noted in the sketch, the span of the truss is 24'-0". Of course, this truss would work between 20'-0" to 28'-0" of span. The spacing of the truss is 12'-0" on center.

With the roof slope of 12 on 12 and the heights involved, a cabin using this truss could lend itself to a story and one-half with the first story composed of the living room, kitchen, bathroom and lower main bedroom or bedrooms. The upper half story could house at least two bedrooms with a bathroom.

The truss shown has two large 10" x 14" horizontal timbers that carry the roof loads. The lower timber is placed at 7'-0" above the finished floor. This would match the height of the exterior doors and windows. The space between the lower timber and upper horizontal timber could house a strip of 2'-6" windows giving significant day light to a living room space. That 2'-6" space between the horizontal timbers could also be filled with a decorative wall surface.

The lower horizontal timber can be a member that raps around the entire structure adding a decorative feature to the exterior. Of course, the upper timber also raps around the entire structure and carries the roof rafters.

In order to provide day light to the upper one-half story, dormers with windows could be used and windows could be placed on the gable ends.

Both the interior and exterior can have more architectural interest by the use of this arrangement of the horizontal members matching the horizontal members of the truss. Other wood exterior surfaces and logs can be worked together to create horizontal, diagonal and vertical shadow lines on the exterior walls.

A massive stone fireplace could fit into an exterior or interior wall of the living room space.

Thursday, August 16, 2007

Communication and Construction

The work to select a good builder for the log cabin is complete and the builder has been selected. A written contract has been signed. Now what should be done to keep the owner in control of the building process? I learned, of course, communication is the key.

The contract should include the contractor's time schedule to complete the log cabin. Of course, the contract should include a list of exceptions which may delay the contractor's schedule and over which the contractor has no control, such as acts of God or delays by suppliers or sub-contractors.

The owner should keep an on-going written diary of the progress of the construction of the cabin. All communications with the contractor should be recorded. Using e-mail may be one method of communication, but use a hard copy of the major decisions to the contractor.

Inspections of the construction process by the owner is extremely important. Ask for a schedule from the contractor about the various components of the construction, such as the foundation work, the first floor framing, the log assembly, and the roof construction. You get what you inspect. Ask a lot of questions!

During the contruction process think and decide about the various fixtures in the cabin. What would you like for the kitchen cabinets, vanity cabinet, toilets, bathtubs, showers, stove, lighting, etc.? Balance your desires with your budget.

Wednesday, July 18, 2007

The Builder

The most important decision you make in building your new log home or cabin is choosing a good general contractor (builder) who is knowledgeable of building log homes or cabins.

Of course, the builder should have good references from past and current customers. The potential customer should inspect a number of homes or cabins that the builder has recently built. A careful inspection should include:

1. Log work tightness

2. Trim work alignment and tightness

3. Cracks in foundation walls, interior partitions, and interior finishes

4. Rain water infiltration

5. Levelness of floors and ridge lines

6. Check detailing of doors, windows, stairs and interior cabinet work

A good builder makes a project go smoothly as he or she knows the sub-contractors, and how to order materials and their delivery. The builder also knows permits required, driveway construction, sewers, water, electric power, the various costs, and the quality of the various materials. The builder can be a great help with the various details and decisions an owner must make on the project.

Communication is key. The owner must explain to the builder exactly what they want and at what cost. Therefore, an early estimate of the cost is very important.

Next, pre-qualify yourself for the total amount of the money you can afford to borrow. An old rule of thumb may be that 28% of your gross income should go for all long-term debt. Don't forget the down payment required. Also, shop for the lending institution like you shopped for the builder.

I like to obtain a set of drawings of the proposed house or cabin with specifications. One can then obtain bids from the good builders you have selected. It gives you more control of the bidding process.

Wednesday, May 30, 2007

Timber Roof Trusses

Many log homes and cabins have trusses that support the roof structure. The trusses accent the open ceiling and give the log home a sense of "structure".

The choice of truss configuration is based on the skill of the workmanship, cost, joinery and, most of all, aesthetics.

Trusses are expensive as they are time consuming to build and are labor intensive. The joinery is the major consideration as the truss members are pieced together by a variety of methods. Usually the trusses are pre-built; that is, they are assembled off site or on the ground at the site and lifted into place by a mobile crane.

The trusses should be engineered. Calculations based on the prevailing snow and wind loads of the area should be determined along with truss member sizes and the timber specie. I like to use rectangular sections of timbers, such as 4"x6", 6"x6", 6"x8", or 6"x10". The timbers are connected together with 3/4" round Thru-bolts with 1/4" steel plates on each side of the timber members where connected to each other. Each connection should be calculated to determine the proper number of 3/4" Thru=bolts on each side of the joint.

Trusses are best used in large rooms. A room 24' x 24' would be an ideal space for one large truss that is spaced at approximately 12' on center. The span of the truss is 24'. Small roof purlins with a 4' spacing then can frame from the end walls to the truss. Of course, other truss spacing may be used, but aesthetics dictate a large spacing for the trusses with purlins at the underside of the roof slope providing a nice arrangement of the structural pieces.

There are many different truss configurations. Just to name a few; Queen, Fink, Howe and Pratt. If the truss span is in the 18' to 25' range, the most economical truss is probably the Fink truss as it has the minimum number of truss pieces; thus reducing the number of connections of member to member.

The Fink truss has a straight bottom chord and sloping top chords that follow the slope of the roof. The web members; that is, the members that tie the top and bottom chords together form a "W" shape with the center of the "W" connecting at the ridge.

Other truss configurations are also used to create a more aesthetic arrangement of the structural pieces. Check with the builder or the log supplier as they may have a favorite truss to build.

Thursday, March 01, 2007

The Great Room

When planning the spaces in our log cabin we wanted a spacious, open, bright larger room. We called it a Greatroom.

We focused on entertainment and family living. The Greatroom is a combination of living room, dining room and kitchen with a near smooth vaulted ceiling. The high vaulted ceiling gives the room a nice feeling of space.

The double hung windows are spaced around the Greatroom and provide an open feeling to capture the outdoors and much needed sunshine. During the evening hours, the vaulted ceiling is illuminated with flourescent strip lighting to cast light up into the vaulted area. Lighting is a key to the success of our great room. There is a five bulb hanging light over the dining table to add some light for evening dining and a table lamp is placed on top of the desk for reading.

The wall finishes of our Greatroom are all wood; logs or wood wall boards with a clear urethane finish. The kitchen cabinets are pine wood and the counter to is red laminate material.

The floor is wall to wall commercial carpeting with a diamond check pattern of green, red, orange, and blue. It is placed on the 3/4" plywood floor sheathing. The carpet adds color to the room.

The black wood stove is positioned on top of a 4" raised platform of green 12" quarry tile. The platform is made of unglazed ceramic tile placed on 1/2" thick cement board with floor tile adhesive. The cement board is supoorted by 2" x 4" wood framing at 16" on center. The size of the platform and the use of non-combustible materials conform to the building codes. This platform provides a base for the major winter focal point: the wood stove with its glass window.

The furniture blends with the rustic interior wall finishes. The dining table and chairs are log furniture made by a Canadian company . Our desk, beds and several other chairs are also made from logs. The couch is dark red leather and one chair is of green textured upholstered fabric. The colors blend well and accent the natural beauty of the logs and other wood construction.

The log stairs with hand- shaped log railings also add a nice rustic look to the furniture and other log construction.

In addition, several wild-life pictures are placed around the Greatroom to add visual interest. We have also enlarged and framed pictures we have taken of the forest. We have winter, spring, summer and fall pictures of one of our favorite areas. Each season displays a different beauty.

The Greatroom is open, spacious and inviting and it is very home-like to us.

Saturday, August 27, 2005

New Cabin - Design

As the pre-cut log builders are more prevalent in our area, I decided to find a local pre-cut log supplier and builder. I visited a number of log home builders and obtained brochures from others.

I chose a local log supplier and builder to further investigate. The builder showed me several log cabins that he had under construction. The cabins showed his mastering of his trade. He also had an excellent record of past experience in building log cabins. This builder had a good working relationship with the log supplier.

I asked him if he would bid on a log cabin design. He agreed and that started my quest for an architectural design of the cabin.

My first scheme didn't go over very well with the family. The layout was too small.

I enlarged the architectural plan to about 1000 square feet of floor area. The floor plan I drew is 24 feet by 28 feet with a loft of 24 feet by 13 feet. The loft is a second bedroom with two large beds and a reading space. The loft is placed above the lower bedroom, kitchen and bathroom. The living and dining room (Great Room) occupy the other 24 feet by 15 feet space. A 15 foot by 8 foot covered porch is positioned on the south side as a shelter for the front door and as a place in the summer to sit and drink coffee and tell fishing and hunting stories.


Tuesday, August 09, 2005

New Cabin

RESEARCH

I started my research by subscribing to a "Log Home" magazine for the year 1993. This magazine proved valuable and showed pictures of the many types of log home being built along with the furnishings.

A friend sent a very important report published by USDA Forest Service and the U.S. Department of Agriculture, titled "Protecting Log Cabins From Decay". This report answered many of my questions about the practical details of log cabin construction and protection from wood decay. The report gave practices of exterior finishing and maintenance along with selection of logs, preservative treatment and types.

The construction details from the report indicated that:
1. Steep roof slopes drain the rain water faster
2. Eaves must extend well beyond the face of the log walls. A projection of 24" for
a one story cabin is recommended.
3. The splash zone of the rain water needs protection (a distance above the exterior
grade) (This distance may be up to 3 or more feet.)
4. Stone or concrete piers or foundation walls provide cabin support and good
ventilation.
5. Slope the exterior grade to allow rain water to flow away from the foundation
structure.

I will refer to the publication as the "Report".

A 1990 annual directory published by "Muir's Original Log Home Guide For Builders and Buyers" also proved valuable. This directory covered the topics of pre-cut logs, the
handcrafted logs, settling, specie selection, profile, joinery, sealing, insulated wall systems
and a method of evaluation.

I will refer to this publication as the "Directory".

To be continued.

Sunday, July 31, 2005

Old Cabin

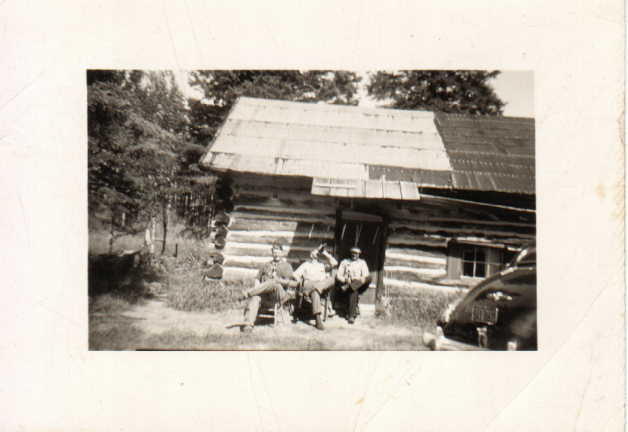
This is a photo of the old family cabin with my father and his friends sitting out front. This photo was taken in the 1940s.

My memory goes back to the 1940's. The log cabin was old at that time. It may have been built in the 1870's or earlier. It was a typical gable ended one story cabin with a full bedroom loft and a kitchen and garage addition. The kitchen and small garage were added some time after the original log cabin was built; perhaps sometime in the 1920's as motor vehicles and roads appeared during that era. The log portion of the cabin was build from field cut pine trees from the area. Chinking was placed between the log joints and the corner junctions were square cut by a saw cut. The fixed sash windows were single pane and indicated some ripples in the glass (an older type glass). The roofing was roll roofing; a common roofing material used during the 1920's . The enclosed photo of the old cabin shows the roll roofing.

The heating of the log cabin was by a wood stove made from an old oil drum placed on metal legs. A large cast iron wood fired stove was used for cooking with a water tank on the side used for hot water to wash dishes. A metal sink was on the exterior wall of the kitchen with a drain that exited thru the exterior wall of the kitchen. A large wooden kitchen table and benches was used for the meals.

The drinking water was brought in from a nearby spring. The water used for washing was caught in an old wood barrel placed to catch rain water off the roof. An outhouse was some 100 feet or so from the cabin.

Our family used the cabin as a weekend and summertime retreat. We loved to fish in the many nearby lakes and rivers, explore the wood, hunt deer, and generally relax.

As with many old buildings, the roofing decayed through neglect and lack of attention. The roof wood boards collapsed on the loft, taking the upper logs and other parts of the structure to the ground.
Blog Widget by LinkWithin