Tuesday, December 04, 2007

Floor Plan Possibilities

In my opinion, the most interesting floor plan for a proposed story and a half log cabin is an "L" shaped plan. The majority of the space is the "great room" and is the short leg of the "L". I've included sketches for one way the "L" shape plan may be arranged.

In this design, the first floor plan has two bedrooms, each approximately 11 feet by 15 feet which includes a closet. The bath is adjacent to the bedrooms and is near the kitchen and the "great room".

The kitchen is long and narrow with a long counter with base and wall cabinets. Eating space is on one end. There is room for a dishwasher and small combination washer/dryer, if desired.

The "great room" could be used for a larger dining area, if required, in addition to the living room. The "great room" is approximately 23 feet by 22 feet, large enough for any arrangement of furniture.

The second floor plan is composed of one large bedroom approximately 15 feet by 16 feet including closets. The bath is adjacent to the bedroom. The second floor room is under a sloping roof. The floor area may seem a bit large, but the useable area is restricted by the sloping ceiling.

A stairway fits into a corner opposite of the bath. The stair runs between the first and second floors.

The "gem" of this floor plan is the "great room" with its massive fireplace and hearth in addition to it's vaulted ceiling space and the three sided bank of windows. It is nice if the "great room" faces the view of a lake, river or mountain scene.

A patio could be placed outside the "great room" to enhance the indoor-outdoor relationship. A crawl space is below the first floor to house the necessary mechanical and electrical services, such as a furnace, hot water heater, and pressure tank for the well water.

This log cabin design has 2064 square feet of floor area. Of course, other plan configurations are possible.

Tuesday, October 23, 2007

Wood Truss

Of all the wood trusses that are constructed for use in a cabin, as an engineer my favorite is the wood truss that is shown in the sketch.

As noted in the sketch, the span of the truss is 24'-0". Of course, this truss would work between 20'-0" to 28'-0" of span. The spacing of the truss is 12'-0" on center.

With the roof slope of 12 on 12 and the heights involved, a cabin using this truss could lend itself to a story and one-half with the first story composed of the living room, kitchen, bathroom and lower main bedroom or bedrooms. The upper half story could house at least two bedrooms with a bathroom.

The truss shown has two large 10" x 14" horizontal timbers that carry the roof loads. The lower timber is placed at 7'-0" above the finished floor. This would match the height of the exterior doors and windows. The space between the lower timber and upper horizontal timber could house a strip of 2'-6" windows giving significant day light to a living room space. That 2'-6" space between the horizontal timbers could also be filled with a decorative wall surface.

The lower horizontal timber can be a member that raps around the entire structure adding a decorative feature to the exterior. Of course, the upper timber also raps around the entire structure and carries the roof rafters.

In order to provide day light to the upper one-half story, dormers with windows could be used and windows could be placed on the gable ends.

Both the interior and exterior can have more architectural interest by the use of this arrangement of the horizontal members matching the horizontal members of the truss. Other wood exterior surfaces and logs can be worked together to create horizontal, diagonal and vertical shadow lines on the exterior walls.

A massive stone fireplace could fit into an exterior or interior wall of the living room space.

Thursday, August 16, 2007

Communication and Construction

The work to select a good builder for the log cabin is complete and the builder has been selected. A written contract has been signed. Now what should be done to keep the owner in control of the building process? I learned, of course, communication is the key.

The contract should include the contractor's time schedule to complete the log cabin. Of course, the contract should include a list of exceptions which may delay the contractor's schedule and over which the contractor has no control, such as acts of God or delays by suppliers or sub-contractors.

The owner should keep an on-going written diary of the progress of the construction of the cabin. All communications with the contractor should be recorded. Using e-mail may be one method of communication, but use a hard copy of the major decisions to the contractor.

Inspections of the construction process by the owner is extremely important. Ask for a schedule from the contractor about the various components of the construction, such as the foundation work, the first floor framing, the log assembly, and the roof construction. You get what you inspect. Ask a lot of questions!

During the contruction process think and decide about the various fixtures in the cabin. What would you like for the kitchen cabinets, vanity cabinet, toilets, bathtubs, showers, stove, lighting, etc.? Balance your desires with your budget.

Wednesday, July 18, 2007

The Builder

The most important decision you make in building your new log home or cabin is choosing a good general contractor (builder) who is knowledgeable of building log homes or cabins.

Of course, the builder should have good references from past and current customers. The potential customer should inspect a number of homes or cabins that the builder has recently built. A careful inspection should include:

1. Log work tightness

2. Trim work alignment and tightness

3. Cracks in foundation walls, interior partitions, and interior finishes

4. Rain water infiltration

5. Levelness of floors and ridge lines

6. Check detailing of doors, windows, stairs and interior cabinet work

A good builder makes a project go smoothly as he or she knows the sub-contractors, and how to order materials and their delivery. The builder also knows permits required, driveway construction, sewers, water, electric power, the various costs, and the quality of the various materials. The builder can be a great help with the various details and decisions an owner must make on the project.

Communication is key. The owner must explain to the builder exactly what they want and at what cost. Therefore, an early estimate of the cost is very important.

Next, pre-qualify yourself for the total amount of the money you can afford to borrow. An old rule of thumb may be that 28% of your gross income should go for all long-term debt. Don't forget the down payment required. Also, shop for the lending institution like you shopped for the builder.

I like to obtain a set of drawings of the proposed house or cabin with specifications. One can then obtain bids from the good builders you have selected. It gives you more control of the bidding process.

Wednesday, May 30, 2007

Timber Roof Trusses

Many log homes and cabins have trusses that support the roof structure. The trusses accent the open ceiling and give the log home a sense of "structure".

The choice of truss configuration is based on the skill of the workmanship, cost, joinery and, most of all, aesthetics.

Trusses are expensive as they are time consuming to build and are labor intensive. The joinery is the major consideration as the truss members are pieced together by a variety of methods. Usually the trusses are pre-built; that is, they are assembled off site or on the ground at the site and lifted into place by a mobile crane.

The trusses should be engineered. Calculations based on the prevailing snow and wind loads of the area should be determined along with truss member sizes and the timber specie. I like to use rectangular sections of timbers, such as 4"x6", 6"x6", 6"x8", or 6"x10". The timbers are connected together with 3/4" round Thru-bolts with 1/4" steel plates on each side of the timber members where connected to each other. Each connection should be calculated to determine the proper number of 3/4" Thru=bolts on each side of the joint.

Trusses are best used in large rooms. A room 24' x 24' would be an ideal space for one large truss that is spaced at approximately 12' on center. The span of the truss is 24'. Small roof purlins with a 4' spacing then can frame from the end walls to the truss. Of course, other truss spacing may be used, but aesthetics dictate a large spacing for the trusses with purlins at the underside of the roof slope providing a nice arrangement of the structural pieces.

There are many different truss configurations. Just to name a few; Queen, Fink, Howe and Pratt. If the truss span is in the 18' to 25' range, the most economical truss is probably the Fink truss as it has the minimum number of truss pieces; thus reducing the number of connections of member to member.

The Fink truss has a straight bottom chord and sloping top chords that follow the slope of the roof. The web members; that is, the members that tie the top and bottom chords together form a "W" shape with the center of the "W" connecting at the ridge.

Other truss configurations are also used to create a more aesthetic arrangement of the structural pieces. Check with the builder or the log supplier as they may have a favorite truss to build.

Friday, May 25, 2007

More Wildlife Art

In a previous post on wildlife art, I gave kudos to the great wildlife artist, Philip Goodwin. I believe he ranked with the great artists such as N.C. Wyeth, Charles Russell and other contempories of the past.

Several years ago, I worked with a fine architect named Scot Storm. From the very beginning I saw in Scot his artistic eye. He was very conscious of doing a good job for our clients. After I got to know him better, he showed me some of his wildlife art. Wow! Not only is he a great architect, he is a great wildlife artist. His art work of ducks is unbelievable!

I retired from engineering work, and shortly after, a colleague mentioned that Scot had gone on his own to do wildlife art full time and his work is now for sale. I knew he would succeed. He has received many awards & recognition including first place in the contest for the 2004-05 Federal Duck Stamp.

For a great visual treat, please take a look at his website: www.Stormwildlifeart.com

Thursday, May 10, 2007

Wildlife Art

Some years ago, when I was a teenager, our family would visit the 'old' cabin on the present property. My father had wildlife art around the cabin walls. He always had the calendars with "predicament" wildlife art. I just loved those old calendars.

The "predicament" wildlife art was usually a copy of an original art depicting a hunter or fisherman with an encounter with a bear, moose or other dangerous animal. A female bear with two cubs running from a fisherman's cabin with a large chunk of bacon and sausages with the fishermen near by watching in surprise is an example of this "predicament" art.

About twelve years ago, I saw a similar 'old calendar' that had "predicament" wildlife art the same as I remember from my teenage years. The calendar was in an antique store. The price on the one section of the calendar framed was $200.00. I had to find out who the artist was who painted this "predicament" wildlife art. The artist's name was Philip R. Goodwin.

A quick look at the artist's biography indicated that he lived from 1881 to 1935. Philip was educated at the Rhode Island School of Design, Drexel Institute, and Howard Pye's School. He loved the outdoors and earned a living as a commercial artist. His most famous commercial trade mark is the horse and rider on the Winchester Fire Arms Posters and Advertisements. Philip was a contemporary of and knew N. C. Wyeth, Charles Russell and Carl Rungius, all great artists.

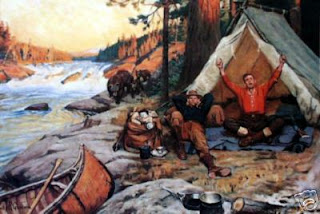
My search continued to find those great old calendars or posters painted by Philip Goodwin. It wan't long, when my daughter surprised me with a framed Philip Goodwin print for a Christmas Present. The print shows two hunters near their log cabin. One hunter is coming out of the cabin entry with a fry pan and the other hunter is reaching for his rifle as a mother bear and her cub are looking their way. I really enjoy that piece of art and all the art by Philip Goodwin.

One Goodwin print isn't quite enough! My search for a second Goodwin print soon ended in a gift store that catered to outdoor and wildlife art. The print shows two campers jumping into a birch bark canoe ready to chase a swimming bull moose. I bought it!

Both Goodwin prints are masterful in composition, subject and vivid colors. They are great examples of "predicament" art and are to be placed on the interior walls of any cabin or house.

Monday, April 30, 2007

Traditional Chinking

Years ago log cabin construction was made with handcrafted logs. The logs were straight and of durable first growth timber. The bark was skinned from the trees while green and was set aside for drying (seasoning). Some logs were pressure treated to resist weathering, insects and termites.

In constructing the old traditional cabin walls, the largest logs were placed at the bottom of the walls, tapering to the smallest logs at the top of the wall. The logs were reversed by placing the log top end of one log directly above the butt end of another log. This method insured a more uniform space between logs. This space between the logs was about two inches, with a minimum space of one inch.

After the logs were placed, chinking of the space between the logs proceeded. Six inch strips of expanded metal lath or heavy, small spaced wire fabric was placed on a diagonal between the logs. The metal strips were securely nailed to the bottom inside face of the top log and nailed to the top outside face of the bottom log. These metal strips were then covered by the mortar that ran continuously between the pgs for the length of each log.

The mortar my family used on our old cabin was a portland cement mortar mix; one bag of portland cement, 20% of lime by volume, and 3 cubic feet of loose plaster sand. These materials were mixed together dry. Water was added to produce a stiff mix. This mortar was allowed to stand for about one hour under a cover of wet cloth, then remixed. No additional water was added to the mortar.

The mortar was then ready to be placed for chinking. The mortar was simultaneously placed into the log spaces from both sides of the wall with compacting tools, pushing the mortar through the openings in the metal lath or wire fabric thus forming an anchor for the mortar.

The compacting tools were wood blocking about ten inches long with convex shaped face to produce a curved concave face to the chinking.

Feather edges against the logs were cut off with a trowel leaving approximately 1/4 inch shoulder on the top and bottom of the joint on both sides of the wall. Two to three hours later, the chinking and logs were painted with water glass (a sodium silicate solution). The water glass film began to peel and flake after several days and was removed with a dry rough scrub brush. The surfaces were then finished with sandpaper and finally stained. This sealed the walls from snow, wind, rain and animals.

In modern chinking (if used), the space between the logs is somewhat reduced. The space is filled with strip foam near the center of the logs and backer rods tight against the foam on each side. Then a synthetic chink is placed tight against the backer rods covering them, the foam and sealing against the logs. This new chink looks and feels like mortar. It is a permanent seal because of the elastic properties of the synthetic chink.

Thursday, March 22, 2007

Selective Logging

When the logger arrived at our place he said "You should have logged the property some ten years ago"

The logger was right as many of the large balsam, aspen, birch and pine trees have fallen because of high winds, decay and "old age."

I hired a local logger last summer who had a great reputation for selective logging of properties; taking only the most mature trees that needed to be harvested and leaving the healthy, younger trees so they will continue to grow.

The logger had all the equipment to cut, trim and lift the large trees into his large logging trucks. The local processing plants were not accepting any trees for a while, so the harvesting was delayed. The local processing plants use the trees to make home building products, such as wood sheathing. The trees can be also used at the paper mills to create paper for newspapers, magazines, etc.

When cutting down the trees, the logger cuts a wedge-shaped piece out of the trunk of the tree with his chain saw. Then the logger makes a chain saw cut on the opposite side of the wedge-shaped cut. The tree loses its strength and balance and falls toward the wedge-shaped side of the trunk.

The logger was able to fell the trees exactly where he wanted them. The falling tree avoids striking other trees or hitting stumps, large rocks, or equipment which might damage the falling tree's trunk. He trims the limbs and may cut the tree into shorter pieces. Some pieces may be 30 to 40 feet long.

Our logger created a landing (a central place to collect the fallen trees) and skidded (dragged) the fallen trees to the landing. He then placed the logs on the truck trailer and when the trailer was loaded with the logs, he transported the logs from the forest area to the processing plant some distance away. He also assembled the cut limbs into brush piles and when sufficient snow was on the ground, burned the brush piles.

The processing plant delay was lifted and the logger proceeded to log the property. Logs must be freshly cut when they arrive at the processing plant. Because of the delay at the processing plant, the logging took more time than expected.

The logger did a great job in selectively logging the forest. Now only healthy trees remain, the paths are open and we can see through the trees and underbrush. The forest will now rejuvenate and young, healthy growth will soon cover the land.

I am excited to see what species will spring up, and also I am looking forward to obtaining some small seedling pine trees and plant them this coming spring.

Thursday, March 01, 2007

The Great Room

When planning the spaces in our log cabin we wanted a spacious, open, bright larger room. We called it a Greatroom.

We focused on entertainment and family living. The Greatroom is a combination of living room, dining room and kitchen with a near smooth vaulted ceiling. The high vaulted ceiling gives the room a nice feeling of space.

The double hung windows are spaced around the Greatroom and provide an open feeling to capture the outdoors and much needed sunshine. During the evening hours, the vaulted ceiling is illuminated with flourescent strip lighting to cast light up into the vaulted area. Lighting is a key to the success of our great room. There is a five bulb hanging light over the dining table to add some light for evening dining and a table lamp is placed on top of the desk for reading.

The wall finishes of our Greatroom are all wood; logs or wood wall boards with a clear urethane finish. The kitchen cabinets are pine wood and the counter to is red laminate material.

The floor is wall to wall commercial carpeting with a diamond check pattern of green, red, orange, and blue. It is placed on the 3/4" plywood floor sheathing. The carpet adds color to the room.

The black wood stove is positioned on top of a 4" raised platform of green 12" quarry tile. The platform is made of unglazed ceramic tile placed on 1/2" thick cement board with floor tile adhesive. The cement board is supoorted by 2" x 4" wood framing at 16" on center. The size of the platform and the use of non-combustible materials conform to the building codes. This platform provides a base for the major winter focal point: the wood stove with its glass window.

The furniture blends with the rustic interior wall finishes. The dining table and chairs are log furniture made by a Canadian company . Our desk, beds and several other chairs are also made from logs. The couch is dark red leather and one chair is of green textured upholstered fabric. The colors blend well and accent the natural beauty of the logs and other wood construction.

The log stairs with hand- shaped log railings also add a nice rustic look to the furniture and other log construction.

In addition, several wild-life pictures are placed around the Greatroom to add visual interest. We have also enlarged and framed pictures we have taken of the forest. We have winter, spring, summer and fall pictures of one of our favorite areas. Each season displays a different beauty.

The Greatroom is open, spacious and inviting and it is very home-like to us.

Friday, February 23, 2007

Old Log Cabins

For your viewing pleasure. Some photos of old log cabins of friends, family and local folks.

Some of these cabins look virtually identical, but if you look closely you can see the differences. Most date from the mid 1800's to the early 1900's.

Please keep in mind that during the Great Depression it was common for people to make a living by trapping and living off the land.

Wednesday, February 21, 2007

Winter Preparations

We frequently visit our cabin during the winter months, so preparations for winter are fairly simple. We know there will be many days when the temperature drops below freezing and even below zero degrees, so precautions must be taken with anything that can freeze.

The first items to consider are the food items . We remove all canned and bottled goods as they will certainly freeze. Some dry goods, such as dry soup, flour, sugar, dry cereals, etc. can be stored in metal or glass containers to prevent any insects, mice, etc. from enjoying them. The covers should be tight fitting.

The blankets and bed linens are laundered and those which are not on the beds are stored in a large trunk or hard plastic boxes. (Once we had moths enjoy the flannel sheets and a cotton blanket.) It is too much work to put all the bedding and blankets away each time we leave, not to think of the work in making all the beds when we revisit the cabin.

As our main source of heat is the wood stove, we always fill the wood box and the log holder on the porch before we leave so that starting the fire will be easier. We also have a kerosene heater which we start as soon as we arrive as the indoor temperature is about the same as outside temperature. We need to be sure we have a good supply of kerosene available.

All the food is removed from the refrigerator. The refrigerator is turned off, disconnected and cleaned with the doors propped open to prevent mold and odor build- up. We have found that our refrigerator starts better if we first turn off the appliance and then unplug it.

Finally, as discussed in this link to a previous post, the water lines are drained and antifreeze added to the toilet, toilet tank, the sink drains, etc.

Tuesday, February 13, 2007

The Ants Go Marching One By One

As soon as the hornets had been dealt with.....large ants started to appear on the exterior and interior log walls of the cabin. We captured a few of the ants and placed them in small glass containers and sent them to the University of Minnesota for exact identification.

The University Extension Entomologist indicated they were carpenter ants.

Carpenter ants are destructive and can eat up the wood of the log walls. They seem to find the little cracks and openings in the wall and create hidden holes and tunnels within the logs if the wood remains moist and especially if wood rot occurs. Carpenter ants can enter the cabin walls many ways.

At first, we noticed a few ants marching across logs and then found wood shavings, mostly in one particular corner. We realized we needed to be concerned about this issue.

Our first attempt was to apply a liquid insecticide on the inside and outside faces of the log walls. Next, we tried a powder dust especially formulated for carpenter bees and carpenter ants. We used these treatments every 3 to 4 weeks during the summers, less frequently during winter months.

When the log cabin needed a re-staining, we tried an insecticide in the log finish.

In spite of all the attempts to rid the cabin logs of ants, we had little success. One very hot summer we noticed an increase in the number of ants both inside and outside the cabin. As there are many rottings logs in the forest, we could not find their nests in the woods. To our amazement and amusement, we watched as the army of ants marched one by one back and forth across the sandy soil surrounding the cabin. Hundreds of ants were actively working that day.

Something further needed to be done!

We happened upon the cabin's original builder and told him of the carpenter ants. He suggested that I go to a particular small, local store and get a liquid concentrate there which is mixed especially for carpenter ants.

We stopped by the store and asked for the carpenter ant concentrate. The store clerk knew exactly what we wanted and poured a small amount of the mysterious concentrate into an old glass quart jar. The jar cover did not matched the jar. So, in an attempt to seal the improper cover to the jar, the store clerk placed some waxpaper over the opening of the jar before putting on the lid.

We were on our 3 hour return trip back to the city from the cabin when we purchased the concentrate. A number of miles down the road, we were overwhelmed by a strong, pungent odor coming from the back of our van. We guessed it was coming from the jar of concentrate with it's imperfect lid.

We stopped on a gravel road just off the highway. We couldn't drive all the way back to the city with the smell......how do we do eliminate the smell? We didn't have any other jars or containers in the van with a better closing lid.

After some discussion, we decided to place the jar of concentrate with it's faulty cover under a nearby small pine tree in the forest, about 20 feet from the edge of the back woods road. I placed a flat rock on top of the cover of the jar to hold the jar upright and keep an accidental bump from knocking the jar over. We decided we would plan on picking up the hidden jar on the way back to the cabin the next week end.

A week later we did go back to the cabin and stopped by the small pine tree in the woods to pick up the jar with the concentrate. It was still there! We put it into a new, larger plastic container with a tight cover and continued on our merry way up to the cabin odor free.

The concentrate was to be mixed with water in a 10 to 1 ratio. One ounce of concentrate and 10 ounces of water could be placed into our plastic spray container. We sprayed the mixture into the rock landscaping that surrounds the cabin, on the foundation, lower logs and the wood skirt board that was placed below the bottom wall log. This treatment appeared to be very effective.

Early this coming Spring we will spray this same insecticide to treat the cabin again. Here's hoping the march of the ants is a thing of the past.

Tuesday, February 06, 2007

Uninvited Guests

As soon as the cabin was finished, a number of uninvited guests arrived.

The ants, spiders, hornets, wasps, bees, deer flies and mosquitoes all showed their presence. Of course, the usual insects were there before us and we had to blend into their surroundings.

Summer is their season, but we can escape into the confines of the cabin interior. The screens are on the windows and a big fly swatter is nearby. We put sticky fly strips on the bottom of the high windows.

Everything seemed under control.

But, then the hornets showed up and built their nests at the soffits of the roof overhangs. They make their nests of hornet chewed plant fiber. The nests look paper-like. Every spring we expect a hornets' nest under one of the eaves of the cabin, garage, or wood shed.

The female hornet starts the nest and lays some eggs. The young become mature and become workers for the female hornet helping to build the nest larger, gather more food and have additional hornets. Soon, we had hundreds of hornets.

The hornets can be a needless pest and they can give painful stings to anyone who disturbs them. The stings are poisonous and can cause painful swelling. I have been stung several times by these critters.

I like to get rid of these uninvited guests by using "BLACK FLAG" spray that is made specifically to kill hornets or wasps on contact within their nest.

I dress head to foot with a long sleeved shirt , full length jeans and gloves and cap. I try to keep my neck and face covered as much as possible. At evening time, after sun set, when the hornets become least active, I give the hornet nest a good 2 to 4 second shot of the Black Flag. The spray coats the nest and saturates it, killing the whole nest and any hornets which return to the nest after the nest has been coated. This seems to control the hornet population for most of the season.

Other "uninvited" guests??? Yes!!! ......To be continued.
Blog Widget by LinkWithin