The choice of the log species used to build a cabin is determined by availability and the cost. The wood that is indigenous to the local area is a good choice.

It is best to have the logs winter cut and air dried. This will help reduce the overall weight of the logs for shipping and will aid in lifting the logs for construction. It will also help shrink the logs prior to setting the log in the log walls, thus reducing to precautions necessary to accommodate shrinkage and detailing around windows, doors, interior walls, etc.

When the moisture content of the logs gets below 19%, a large amount of the log shrinkage has been done. The moisture content is best measured by a moisture meter. It is ideal to get the moisture down to 15% or below to be sure the logs won't check. Of course, shrinkage will vary and will reach an equilibrium with the environment, and will have some differential moisture content between the inside and outside of the exterior walls. This differential is most pronounced during the winter.
This leads to the log profile (or how the logs join together). The choice of log profile and the wood species is important because some joining systems work better with some wood species than with others. As an example, Western

Red Cedar is easier to cut to very close tolerances, thus making the tight fit between logs.
Another important factor of the log profile is the ability of the log to shed rainwater. If the log is milled to square or other shape other than round, it is necessary that rain water remain on the exterior face of the wall and not enter the joint between the logs.

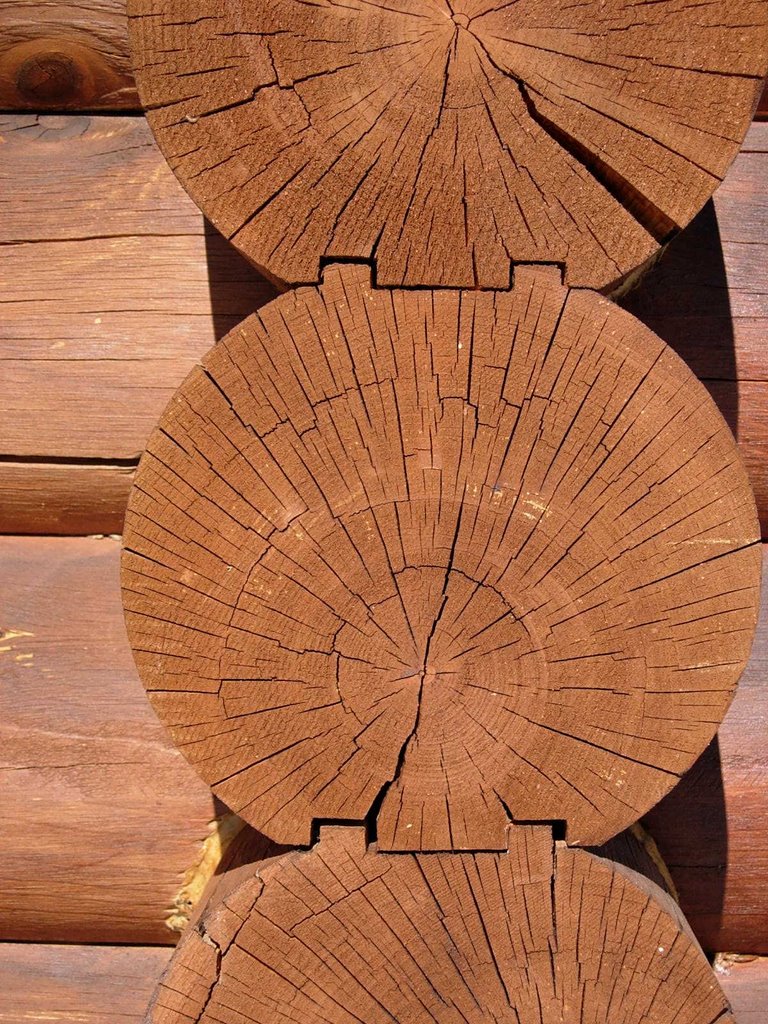
The log chosen for our cabin was a Red (Norway) Pine, indigenous to our area and was low cost. Western Red Cedar was an option, but more expensive. The log is curved both on the inside and outside of the log and has a flat top and bottom. The top has two tongues and the bottom has two grooves. The tongue profile matches the groove profile so as to fit together. During erection of the logs, two 1/8" Butyl Strips are placed on top of the two tongues to aid in fitting the joint together. (See photo of the log profile). The center of the log is very near the center of the cut profile which adds to the structural stability of the log wall.
Also, note that at the corners where the logs overlap, the log ends are flush and are not a butt and pass corner. Usually, the butt and pass corners permit weathering of the logs which will lead to log decay.
The log shrinkage in the exterior walls of the cabin was allowed to happen as vertical steel rods were placed in the wall corners and other locations that run the full height of the log wall thru vertical holes placed at the center of the logs. This wall shrinkage keeps the log to log joints tight and keeps the rain water out of the joints.
One possible problem with the double tongue and groove system (shown in the photo) of the cabin is that moisture can form between the grooves, caused by condensation in the winter time. The thin Butyl Strips tend to mitigate this potential problem. After ten years of the logs in place this condensation problem hasn't been detected in our cabin.
As an additional insurance, we applied a high quality stain sealer (
High Sierra Log Stain) to the exterior of the cabin and caulking was placed in the exterior corners.
 Wood decay is created by microscopic fungi which feeds on the starches and sugars that are in the wood. The fungi slowly destroys the wood cell structure of the log.
 Wood decay fungi requires four conditions to survive: a warm temperature (about 70 degrees to 100 degrees F), oxygen, wood (food source), and water. Keeping the water away from the log contruction is the most effective means of decay control.
 Of course, choosing the proper wood species helps control wood decay too. Wood species such as cedar, cypress, redwood heartwood are naturally resistant to decay and insect attack. The heartwood is that portion of the log that is the central column of wood that runs through the center of the log. The sapwood of the log is that wood that surrounds the heartwood and is less durable in nature. The sapwood is the light colored wood: whereas, the heartwood is the darker portion of the log.
 The historic log structures of Europe, United States, and Canada are grand because of the virgin timber of years ago. These virgin timbers had large portions of heartwood, thus these log structures have stood for years. Some good examples are the Lodges of Yellowstone, Glacier, and Yosemite National Parks.